
A fold-down table mounted to the wall takes back floor space the moment you’re done eating or working, which matters most in a studio apartment or room under 400 square feet.
The catch: the frame has to hit wall studs, and the hinged tabletop needs enough clearance to swing down without catching on baseboards or furniture.
This build uses joint compound pressed into texture for the front panel, so the table doubles as wall art when it folds up.
1. Cut the Front Panel and Tabletop
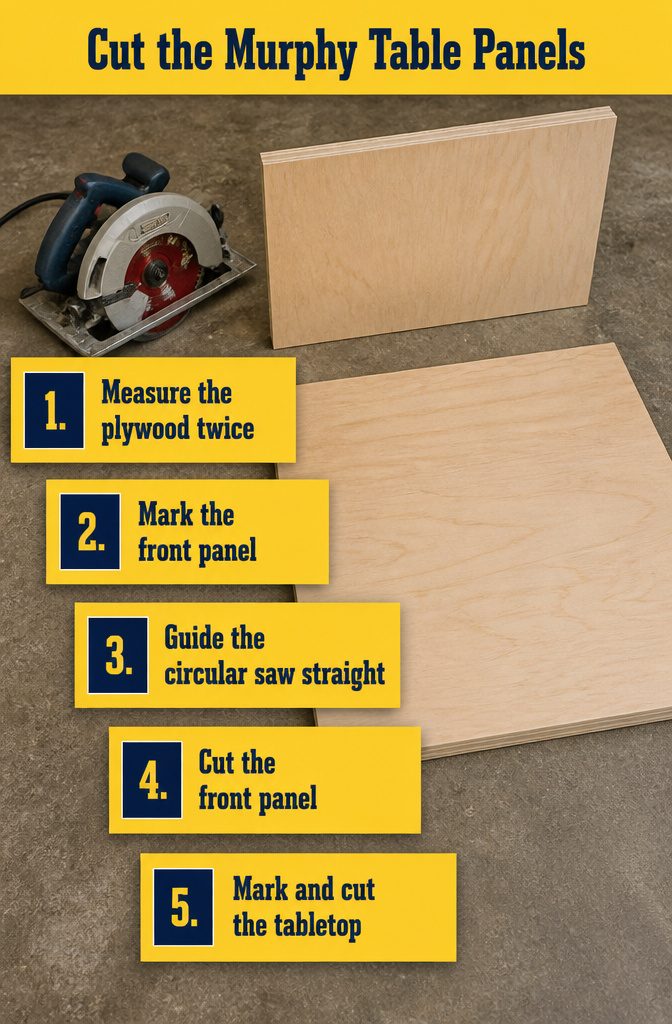
The first two cuts set the geometry of the whole build: the front panel that holds your artwork and the horizontal panel that becomes the tabletop.
I ran both with a circular saw and a saw guide, which keeps the blade tracking straight across plywood without wandering.
The front panel shows when the table folds up, so any tear-out or drift in the cut line becomes visible in your finished kitchen.
The tabletop panel needs the same precision since its edge meets the frame tight when the table swings down.
The source I pulled from gives no dimensions in the body text. Plans live elsewhere, separate from the walkthrough.
That means measuring twice here matters more than usual. You commit the sizes when you mark the sheet, and the saw makes them permanent.
2. Build the Frame From 1×6 Boards

- Cut the frame pieces from 1×6 boards using a miter saw. A circular saw works just as well if that’s what you have.
- Pre-drill pocket holes with a pocket-hole jig to join the pieces cleanly. No jig? Run screws straight through the face of the boards instead.
- Apply wood glue to the joints before screwing the frame together. The glue holds better than screws alone.
- Fill any visible pocket holes with wood plugs. Spread a bit of glue around each plug once it’s seated, then press it in.
- Sand over the plugs and the surrounding area. The glue mixes with the sawdust as you work and fills any small gaps for a smoother finish.
3. Add Shelves and Wall Supports

The shelves and supports go in next, and this is where the dimensions matter.
Use narrower boards than the frame pieces so the table folds into the opening and sits flat against the back when it’s up. Pre-drill pocket holes into each shelf piece before you fasten anything.
Check fit with a square as you go. Once everything lines up, screw into the pocket holes to lock the shelves in place.
The shelf layout is yours to decide based on what you’re storing. If you’re using the table for entertaining, size the openings to fit serving platters or glassware.
If it’s more everyday workspace, adjust the spacing for office supplies or small bins. Plug the pocket holes after assembly so the shelves look finished from the front.
To mount the whole unit on wall studs, add 1×2 lumber across the top and bottom of the back panel.
These strips form a cleat that distributes the weight and gives you solid anchor points. A clear coat on the frame lets the natural wood contrast with the artwork you’ll add to the front panel.
4. Make the Joint-Compound Art
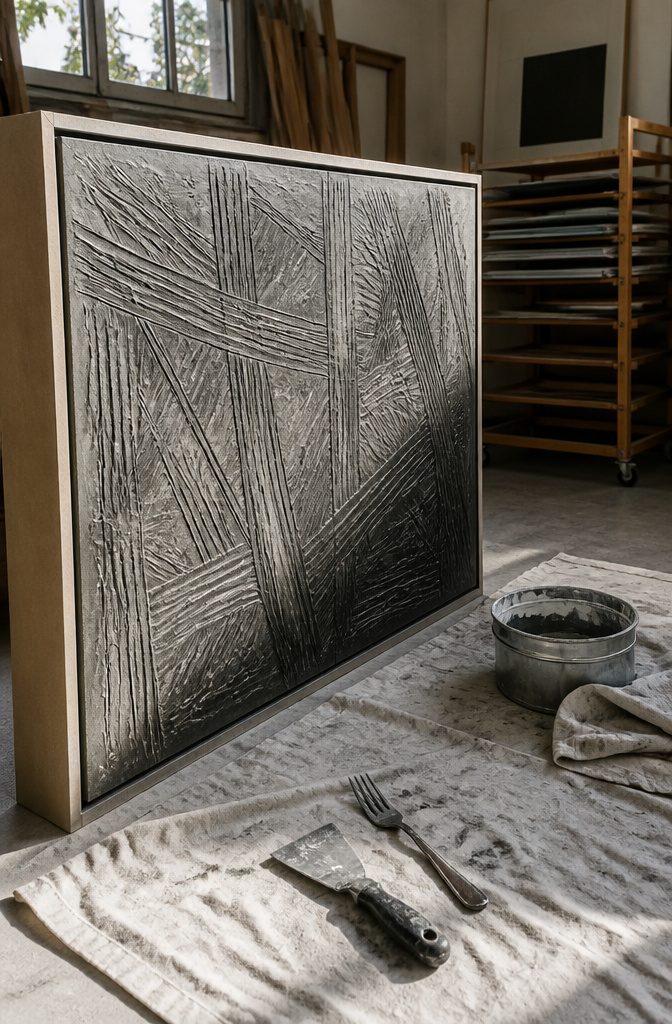
- Spread joint compound over the front panel with a putty knife or trowel. This is the piece that stands vertical when the table is folded and acts as the leg when it’s open. Smooth it as flat as you can, but don’t chase perfection.
- Press a design into the wet compound before it sets. A broken hair clip works, or the edge of a comb, a fork, or anything with texture. Draw lines, stamp shapes, or scrape a pattern. The compound takes detail well while it’s still soft.
- Let the panel dry overnight. Joint compound needs at least eight hours to cure hard enough for paint.
- Touch up the dried surface with black and charcoal-gray paint. I used what I already had. A dry brush picks up the high spots in the texture and leaves the valleys lighter, which brings out the pattern you pressed in.
5. Hang the Table on the Wall
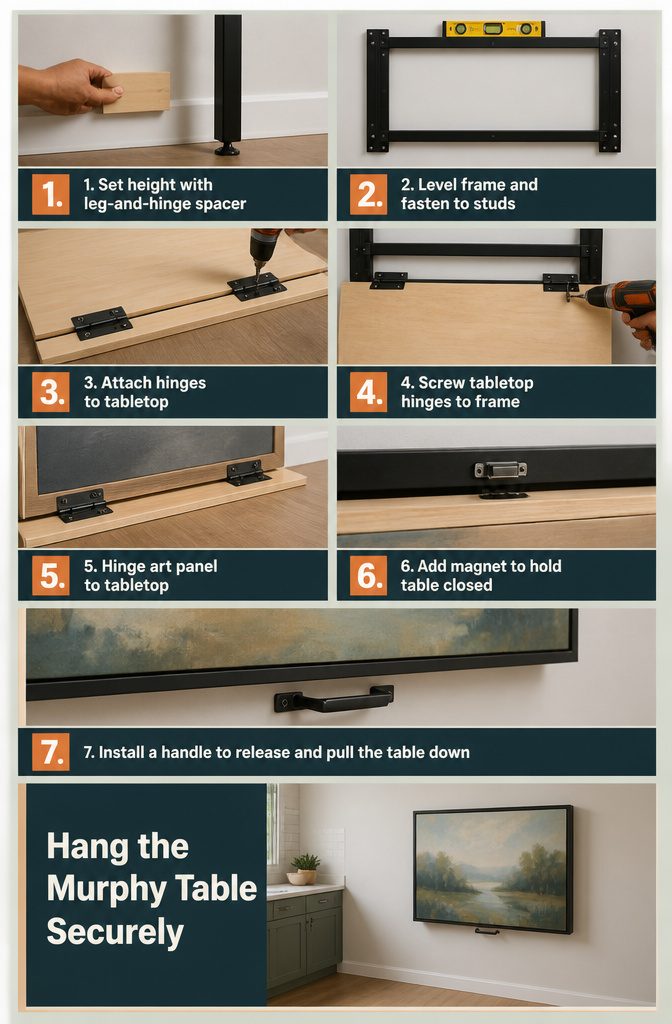
- Choose a hanging position that lets the front leg reach the floor. Account for the leg height and the thickness of the hinges when you measure. Cut a wood spacer to that combined height and hold it against the wall where you plan to hang the table. The spacer tells you exactly where the top of the frame needs to sit.
- Drill into the wall supports while checking alignment with a level. Hold the frame against the wall at the height the spacer indicated. Check that it sits level before you drive the first screw. Attach the frame to the studs or wall supports you installed earlier.
- Mark and attach the hinges to the tabletop. Set the tabletop face-down and position the hinges along the back edge. Mark the screw holes, then drive the screws to fix the hinges in place.
- Connect the tabletop to the frame. Lift the tabletop into position and screw the free side of each hinge into the wall-mounted frame. The table should swing down smoothly and fold back up without binding.
- Attach the art piece to the tabletop with hinges. Fasten a second set of hinges to the back of your art panel, then screw those hinges to the front of the tabletop. When the table folds up, the art sits flush against the wall.
- Add a magnet to latch the table upright. Fix a small magnet to the top edge of the frame or the wall above it. The magnet holds the table closed when it’s folded; a surprising amount of grip comes from even a modest magnet.
- Install a handle to release and pull the table down. Mount a simple pull handle on the front of the art panel. You need something to disengage the magnet and lower the table, and a functional hardware-store handle does the job without competing with the art.
Why a Fold-Away Table Saves Space

The table folds flat against the wall when you’re not using it, which is most of the day in a studio apartment or tiny house.
You pull it down when you need a surface, latch or prop it in place, then fold it back up when the meal or the project is done.
The wall space it occupies doubles as storage or even a piece of art in the meantime, so you’re not looking at a blank hinge bracket between uses.
In a 300-square-foot space, the same piece can hold wine bottles and cutting boards on shallow shelves when it’s closed, then swing down to seat four people when friends show up.
That flexibility matters when every piece of furniture has to justify the square footage it takes. A fixed table in that footprint would mean choosing between a workspace and a place to walk, and the murphy version keeps both.
Where a Murphy Table Fits Best

A murphy table makes sense anywhere you need a surface sometimes but not all the time.
Studio apartments, tiny houses, and small rooms benefit most, since the table folds flat against the wall when you’re done and gives you the floor back.
What these tables handle:
• Dining.
Pull it down for meals, fold it up when you’re finished. No full-time table blocking the middle of a one-room apartment.
• Desk work. Making out bills, practicing writing, or handling paperwork that doesn’t need a permanent setup.
• Hobbies. Making a quilt, sorting craft supplies, or spreading out materials for another hobby that takes surface area but not all day.
• Extra desk space. A second work surface when you need it, gone when you don’t.
• Occasional events. Holidays or family gatherings where you suddenly need seating for six instead of two.
The table doesn’t have to hide. It just has to be secure to the wall, whether you leave it visible or tuck it behind a cabinet door.
Materials and Tools for One Weekend
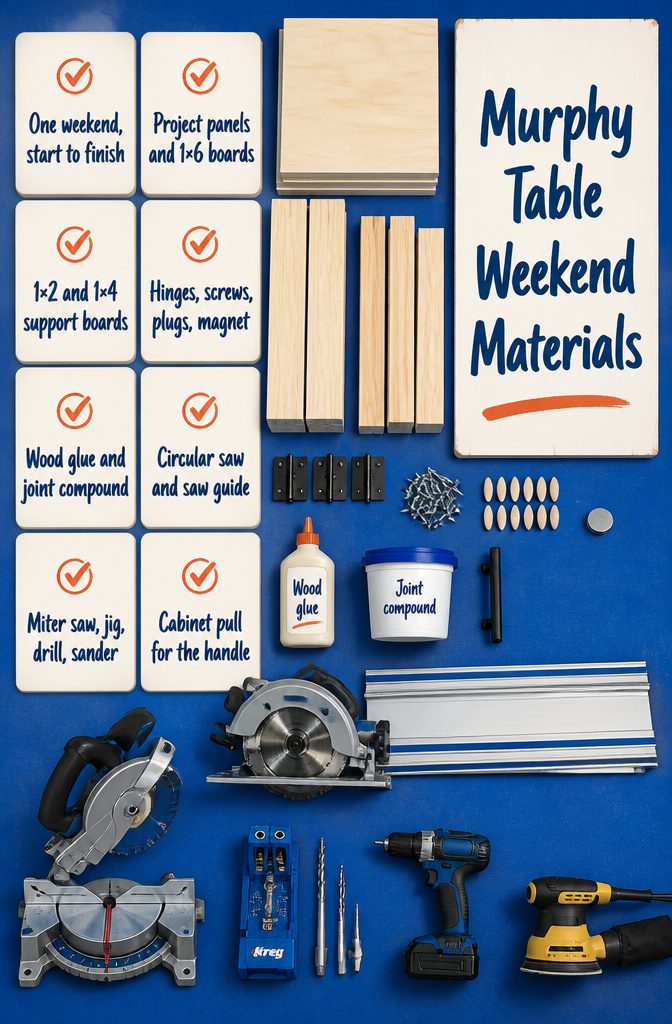
I built this table in one weekend, start to finish. The materials are straightforward, and you probably already own most of the tools.
Materials you’ll need:
- Project panels for the front panel and tabletop
- 1×6 boards for the frame
- 1×2 boards and 1×4 boards for shelves and supports
- Hinges to mount the table to the wall
- Pocket-hole screws and pocket-hole plugs if you want a clean finish
- Wood glue
- Joint compound for the artwork panel
- Cabinet pull for the handle
- Magnet to hold the table closed
Tools you’ll use:
- Circular saw and circular saw guide for cutting the panels
- Miter saw for cutting frame pieces (a circular saw works if you don’t have one)
- Kreg Jig for pocket holes (optional but cleaner than face screws)
- Drill/driver
- Sander to smooth plugs and edges
Frequently Asked Questions
Is there such a thing as a Murphy table?
Yes. A Murphy table is a fold-down table that mounts to the wall and swings up flat when not in use, freeing up floor space the same way a Murphy bed does.
The table pulls down for dining, desk work, or hobbies, then latches closed against the wall. You can build one in a weekend using plywood panels, 1×6 boards for the frame, hinges, and a magnet to hold it shut.
Should I buy a pre-built Murphy table or build my own?
Pre-built Murphy tables work well in rooms large enough to fit a full-sized table when needed but empty the rest of the time.
DIY builds give you more flexibility to fit tight spaces like studio apartments or small corners, and you can customize the dimensions and shelving to match what you need to store.
Building your own also costs less and lets you add custom artwork or finishes.